Arts & Crafts
Projects
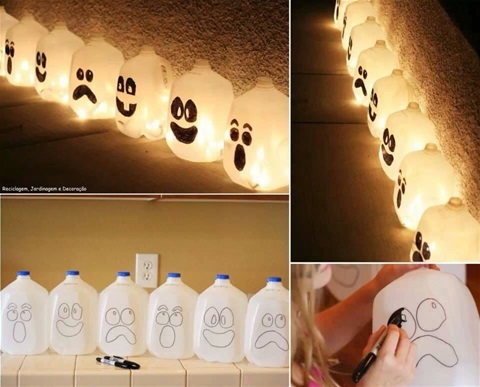
Halloween Ghostly Jugs
Needed:
8-12 large empty milk or juice plastic jugs
1 black marker pen
1 matt knife or box cutter
8-12 battery operated lights
Instructions :
Wash out your empty jugs and using the matt knife , carefully remove jug bottom , now using your marker draw diffrent Ghostly faces on one side of jug (can also do jack-o-lanterns) , filling in as shown in picture , then place tbe battery operated light beneth jug , and watch it glow
Bite Size Caramel Apples
Needed:
1 package lolliepop sticks * ( may be found at cake decorating supply store, or in some markets where cake mixes are found )
4 - 5 granny smith apples
1 sheet of waxed paper
1 melon ball scoopet tool
1 packet Kraft Caramels or Caramel bits
1 double boiler
1 apple peeler
Instructions:
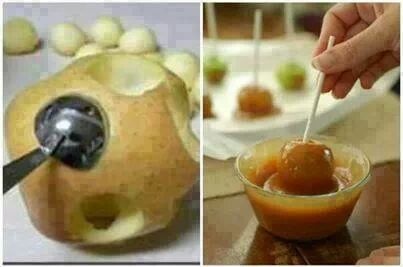
Peel your first apple, then carefully use melon baller to make uniform sized balls, place a lolliepop stick in very centre of each ball, now using your double boiler , place water in bottom and your caramels in top , place over med. heat and melt your caramels , have your waxed paper set to one side , ready to place finished caramel apple bites on , when caramel is smoothly melted , dip each ball into it , let excess caramel drip off , and place finished balls on waxed paper, you may get fancy , by rolling bottoms of balls in either sprinkles or chopped nuts , ** ( note this must be done before caramel fully set )
*** [Additional note , Candied apple mini bites may be made , by substatuting cinnamon imperial candies in place of the caramels ] Repeat process with other apples , *** ( Hint ; to keep peeled apple balls from turning brown , place in a bowl of cold water with a little lemon juice in )
Bake In Apple Pie
Needed:
4 Granny Smith Apples
1 apple corer
2 cups diced apples
1 tsp. cinnamon
1/2 cup sugar
1 sheet pie crust
1 kitchen knife
1 baking dish
1 mixing bowl
4 small pats butter
Instructions :
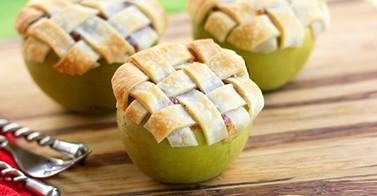
Heat oven to 365 degrees , core your apples , without damaging your outside apple shell , remove the apple , place with cinnamon and sugar replace into your apple shell and top with strips of pie dough in criss cross pattern, dot with butter and place in baking dish, bake 25-35 minutes
Watermelon Grill Centrepiece
Needed :
1 small round watermelon
3 stalks celery
10 wooden skewers
1 kitchen knife
1 box tooth picks
1 melon baller
assorted fruit cubes , ( honeydew , cantalope)
assorted berries ( blueberries , strawberries , blackberries)
1 container pineapple wedges
Instructions :
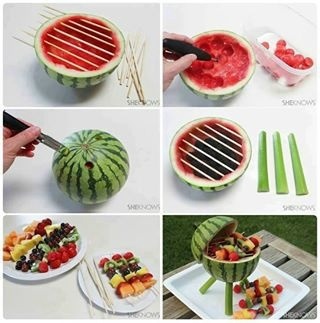
Use your knife to cut watermelon into two pieces, bottom half should be slightly larger than top portion , use melon baller to scoop out both portions , place 6 of your skewers thru your bottom part (imitating a grill) if smaller melon you need 4 skewers , turn over bottom section and make 3 cuts large enough for you to place your celery in a tripod formation , even out celery so centrepiece will stand up, cut in half your hollowed out top section , discard one half, and using your tooth picks attach top section as shown above , ( so your grill will look like top is half open ) , trim any skewers that are sticking out of side of bottom area , now with remaining skewers thread your berries , melon balls (watermelon you removed before) melon cubes and pineapple , alternate making them look like kabobs , place your finished fruit kabobs atop your watermelon grill and place on your table at your next BBQ or Picnic
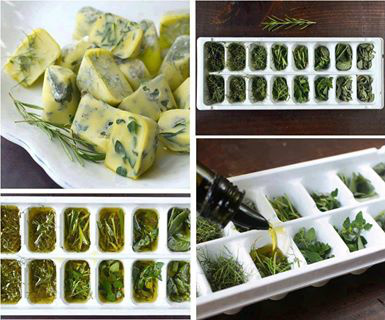
Fresh Herb Stock Cubes
Needed :
1 clean and dry ice cube tray
1 bottle of Extra Virgin Olive Oil (E.V.O.O)
1 bundle , fresh herbs ( rosemary , basil ,terragon )
1 kitchen towel
1 working freezer
Instructions :
Wash out your ice tray and thourhly dry , next take your bundle of herbs , rinse and pat dry with towel then break or tear herbs into small pieces , now take your pieces and tuck them into your ice tray , now fill tray with your olive oil,now pop into freezer oil will clot into a sort of butter consistancy, use in soups or stews or even in baking
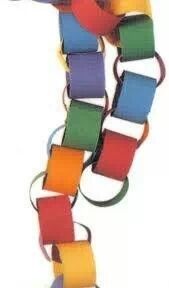
Christmas Tree Paper Chain
Needed:
5-6 diffrent coloured 8x10 pieces of construction paper
1 tube white glue
1pair scissors
1 ruler
1 pencil
Instructions :
Using your pencil & ruler , mark off strips , 1 inch wide , then use your scissors to cut strips , once cut , take the first one and glue it closed (end to end), forming a ring shape , next take your second strip and repeat , this time put strip thru first ring bwfore gluing closed , repeat until your chain is complete , switching colours as you go
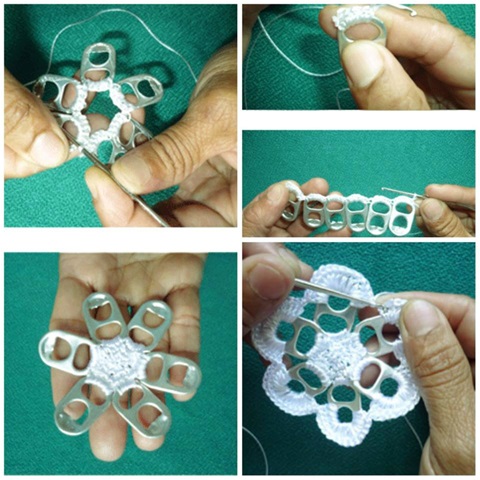
Pull Tab Snowflakes
Needed :
6 Soda or Beer Pull Tabs
1 crochet hook
1 spool crochet cotton
1 sewing needle
1 pair sewing scissors
Instructions :
Carefully sew your tabs together in a star or circular shape , then using a small or mid sized crochet hook and cotton , crochet a pattern filling the centre and going around each tab until done (note, I don't crochet, but above picture should be of some help to you )
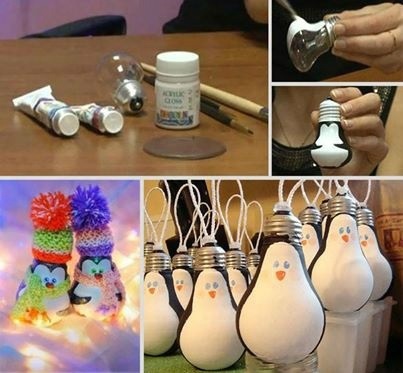
Penguin Bulb Ornaments
Needed :
1 tube white acrylic paint
1 tube black acrylic paint
1 tube orange acrlyic paint
1 packet google eyes
1 bottle white glue
1 coil thick hanging wire
1 paint brush
5 or 6 old light bulbs
Instructions :
Paint your bulbs white and black as shown in photo , let dry, then paint on their beaks , next get your glue and google eyes and place above the beak, now place your wire around end area of bulb , making a hanging device for your ornament
Candy Cane Sled
Needed :
2 candy canes
1 regular size kit kat bar
10 hersheys kisses or starlight mints (wrapped)
1 bottle white glue , or hot glue gun
1 lenght of christmas style ribbon
Instructions:
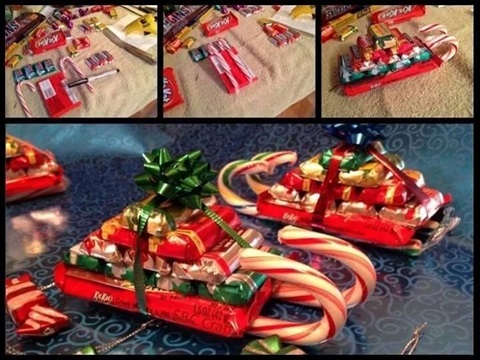
First glue your candy canes to the bottom of kit kat bar , one at each side, then , using either starlight mints or hershey kisses, glue first 4 to your kit kat sled, then 3 ontop of those , then 2, topping off with a single one ,then wrap with your ribbon bit to finish
Citrus Candles
Needed :
1- Orange , Grapefruit , Lemon or Lime
1- kitchen knife
1- spoon
1/4 cup cooking oil
Instructions:
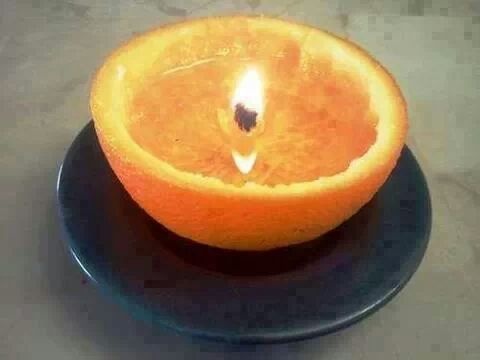
Using your knife , cut your citrus into two halves , then use your spoon to remove the fruit( eat or discard), clean your empty fruit rind , leaving intact core ( use as candle wick, or place woonen match in center as wick) then fill with your cooking oil and you have yourself a candle
3 D Paper Hearts & Roses
Needed:
1 bottle white glue or glue stick
1 pair scissors
4-5 sheets red or pink construction paper
1 #2 pencil
Instructions:
Draw a slightly larger heart than you wish for finished product , cut out heart , then using either glue or glue stick pinch together from behind, ,*( The slightly larger part allows your heart to looked puffed out or 3 dimentional) , be sure to hold twisted and glued area until dry , repeat using diffrent sized heart cut outs
** [Note; Paper Roses may be made by ] ; cutting out different sized circles , then cut a slit part way into circle , and twist it into a cone shape , glue in shape & hold til dry , Flower may be constructed by glueing cones of different size and same colour and glue one inside the other , (using largest circle first ) then next size then finishing with smallest in the middle, colours best for Roses are Red and White , Pink or Yellow may also be used
Chocolate Strawberry Hearts & Chocolate Marshmallow Hearts
Needed :
1 basket or container ripe strawberries
1 box toothpicks
1 package dark or milk chocolate chips or candy making discs
1 package white chocolate chips or candy making discs
1 container red food colouring
1 plastic squeese bottle
1 package mini marshmallows or container of marshmallow fluff
1 kitchen knife
1 double boiler
Instructions :
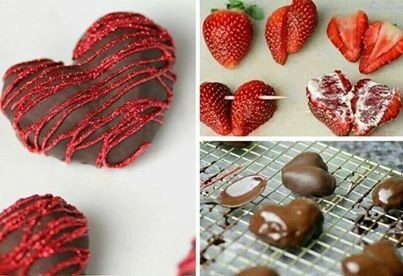
Using your knife , slice your berries into two same size pieces to form a heart, or slice berries in half set side by side and place toothpick thru connecting the two pieces , then using your toothpicks , thru the side of piece put the two pieces together, now if you have chose to cut the slices thin those may be spread with your marshmallow spread or melted marshmallows, then dip the hearts into melted chocolate , and let set up, if you have chosen to do the sliced in half pieces dip them into the melted chocolate , after set up , melt some white chocolate add a few drops red food colouring and put mixture into your squeeze bottle and drizzle across the top, you may do the same over your marshmallow hearts , once set up, carefully remove toothpicks, if done correctly the enrobement in chocolate should hold them together
**(Note On How To Use Double Boiler ) have boiling water in the bottom part and your fresh dry chocolate pieces in the top, the steam from the boiling water beneath shall be what melts your chocolate
***(You may switch colours) and dip in white chocolate and drizzle with dark or milk chocolate if you prefer
Strawberry Roses
Needed :
12 wooden cooking skewers
12 strawberries
1 kitchen knife
1 glass vase or empty pop bottle
Instructions :
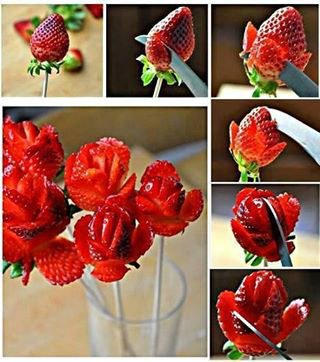
First rinse your berries , (** the larger the berry, the bigger the rose ) , starting at the pointed end of berry , make careful and even cuts , not too deep , continue all the way around , making cuts slightly larger as you move around your fruit , once you get to the bottom (or top of berry) carefully seperate your cuts into petals , repeat with each berry , then carefully insert your skewers into bottom of each strawberry , then display them in your vase or pop bottle for a dozen strawberry roses
Bottle Garden
Needed :
10-20 Empty liter soda bottles , with caps
1 or 2 small bags of potting soil
1 small container pebbles
1 small container pebbles
10-20 small plants or packets of seed
1 matt or craft knife
1 garden trowel
20 nails
4 - 2x4 beams
1 spool picture hanging wire
1 hammer
Instructions:
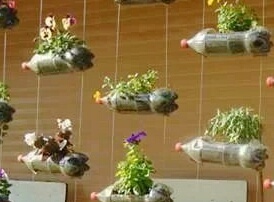
Use your hammer, nails and 2x4's to make a frame for your hanging garden , take your empty soda bottles ,* (cap on), and using your craft or matt knife cut a rectangle in the centre of one side of each bottle , in bottom of each bottle (side being bottom)same side drainage holes , scatter pebbles before placing soil in ,then if you are using seeds place potting soil in each bottle and push seeds into the soil , if using plants , carefully place small plant into bottle , then place the soil in around plant , keeping bottles on their side , now at end and neck of bottle string the wire, on the inside top beam of your frame , space nails *( using two for each bottle) , then hang wire from nails & attach carefully to the wire you have placed around your bottles, you may want to stagger length of hanging wires, water your mini gardens ** [ you will want to put a few drainage holes in opposite side of bottle from your opening ]
Tire Garden
Needed : 12 regular sized tires
1 wheelbarrow size tire
5 or 6 assorted colours of paint (house works better than spray )
3 bags potting soil
13 assorted flowers or other plants
1 garden trowel
1 paint brush
1 watering can
Instructions :
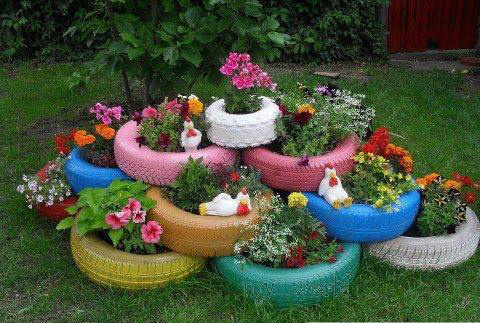
First stack your tires , six on the bottom row , five on next row , two balanced on those , then top with smallest tire, ( this step best done after painting tires ) Once painted and stacked tires are in place , fill centres with potting soil , then transplant your assorted flowers or other plants and be sure to water them , ( so now you know what to do with old spare tires lying about the place )
Grow Your Own Pineapple
Needed :
1 ripe pineapple
1 kitchen knife
1 packet rooting powder
1 glass or empty mayonasse jar
4 toothpicks
1 garden trowel
1 small bag potting soil
1 flower pot or other planter vase
Instructions :
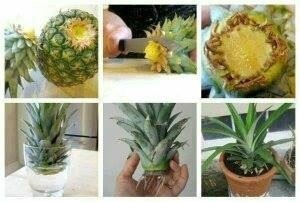
First remove the crown (top of pineapple) , not by slicing , you want to sort of dig round the crown , it shall leave a bit of a crater as shown in shot , dip your top or crown into the rooting powder, push your toothpicks into crown's base at four sides, suspend it over your glass of water (with it just touching water, when roots start to form get your soil and planter , wait until roots are at least an inch and a half long , then carefully plant your crown in the soil , pack soil loosely round crown until roots have taken, then you may pat soil down more
Egg Shell Garden
Needed :
1 empty egg box
12 broken half shells
1 packet of seeds
1 small bag potting soil
1 common pin
Instructions :
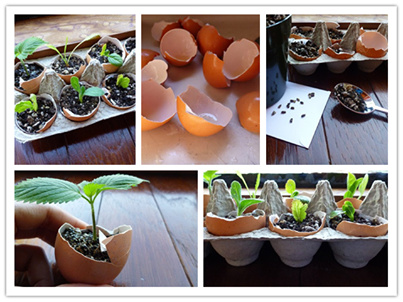
Using your pin , carefully poke one or two holes in bottom of each shell , then place a small amount of soil into each shell , next place a seed or 2 per shell , cover with mre soil and place each half shell into empy carton and add a few drops water to each , the holes in shell are for drainage of water
Cardboard Tube Flowers
Needed:
4-5 Paper Towel or Toilet Paper Rolls (empty of paper)
1 pair scissors
10-12 clothes pins
1 bottle of glue or glue stick
1 med. craft paintbrush
1 container poster paint
Instructions :
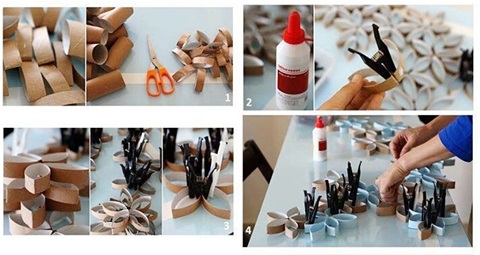
Flatten slightly, your cardboard tubes ,then using your scissors, cut 3/4 inch sections , until all cut , then place your cardboard petals into a sort of star or daisy shape and glue in place * ( here is where your clothespins come in) hold petals (glued) in place til dry with clothespins, once dry use your paint and brush and pretty up your flowers
Shadow Box or Frame Clocks
Needed:
1 clock movement box with hands ( found in some craft and hardware stores )
12 Shadow Boxes or photographic Frames
12 Frame hangers
12 Framing nails
1 bracket for mounting movement box
1 battery for running of movement box
12 assorted photographs for your frames
1 Hammer
1 spool of framing wire , to hang frames with
Instructions :
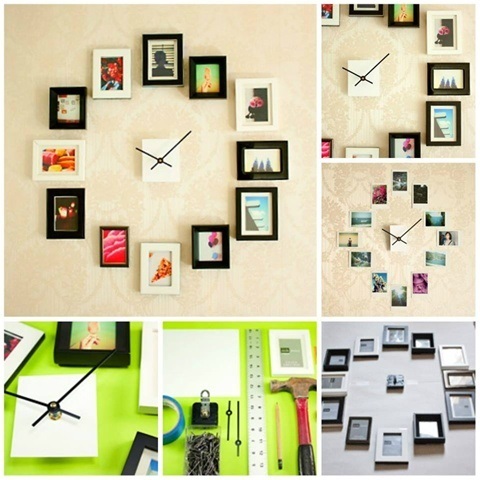
Put movement box together, placing hands on front and remembering to place battery inside, hang movement in centre of wall area planned for clock, then place your frames around in a circle, so that your first (or 12:oo) is at the very top and your (6:00) is in centre, in a direct line beneath both the movement box and your 12:00 frame then place the other frames around making a circle as shown in above photo
Cork Clothes
Needed :
250 large wine bottle corks
1 dress form
1 spool med. gauge wire
1 heavy duty needle
1 container common pins
1 hot glue gun
3 or 4 glue gun refills
1 matt or craft knife
1 under garment or old shirt
Instructions :
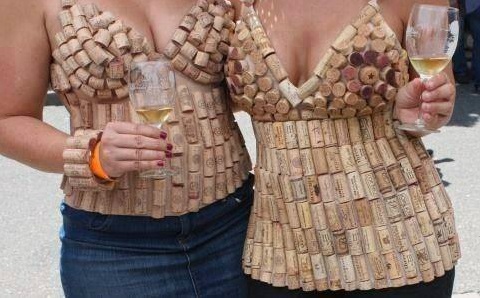
Place your garment on dress form , and pin in place , you may either make this with whole corks or half, if you have chosen half , your item may only be worn once, as it can not be put in washing machine, using your glue gun , glue half corks starting from bottom to top all the way round, even full cork may only be worn once, for full cork clothing, make hole thru centre of corks and starting from bottom to top , thread your wire thru each cork and also glue each cork , go all the way around, then repeat, only from this point on you will not only glue sides of corks but the bottoms of second row to the top of first row, and next row it will be glue on top of cork ,all the way around , repeat the process til finished , it will get trickier towards the top
Cork Bracelet
Needed:
8-10 wine bottle corks
1 hot glue gun
Instructions:
Place your corks (standing on end) in a circle, slightly larger than your wrist , down both sides of cork place a line of hot glue , press corks together to form the circle glued together , let dry , then slip over wrist , as seen above
DIY Faux Pearl mobile cover
Needed :
1 mobile phone cover
1 tube epoxy glue
1 large package Faux Pearls ( get at craft shops)
2 large fancy buttons
Instructions :
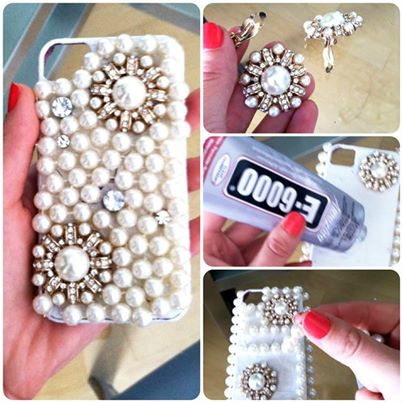
First place your buttons as shown , one at opposite corner from other , then place dots of epoxy and place a faux pearl on each epoxy droplet , continue this until your mobile case is covered *( do not cover cut out section) you could cover sides if you like, however getting cover on and off your mobile might be harder if you so decide
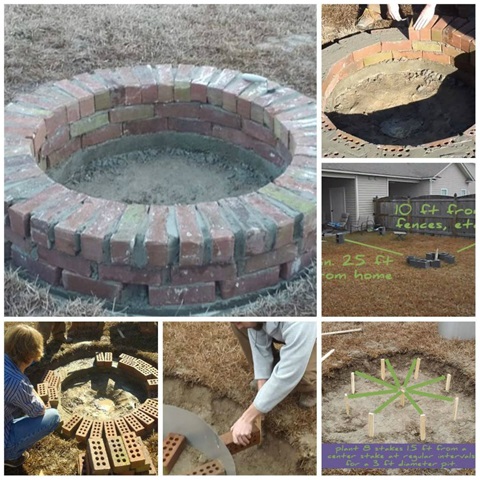
Outdoor Fire Pit
Needed :
150 common red or clay bricks
20 pound bag of sand (to line bottom of pit )
1 shovel
1 mallet
1 large black tarpauline (tarp)
9 wooden survey style stakes
1 tape measure
2 large bags quik crete ( quick drying concrete) hardware store
water
Instructions :
Making sure ring is fifteen feet away from any nearby fences and at least twenty or twenty five feet from nearest building, measure and dig out pit ( accounting for brick lining pit should be made slightly larger, place 1 survey stake in centre of pit, then around it at equal spaces place the remaining eight , line pit with your tarpauline , then with sand , starting on inside bottom ring place your first ring of bricks , fixing in place with dollop of cement , and taping in place with mallet , repeat with second ring of bricks , the top ring the bricks are placed on their side , the above took fourty five bricks for the top ring , (**Optional , if you wish , your fire pit may double as a grill , by placing a metal ring i top area which can be fitted with bars across top)
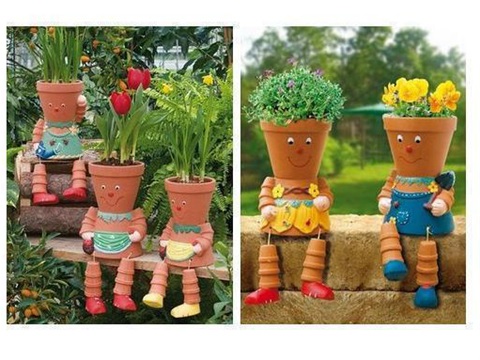
Flower Pot Buddies
Needed :
2 eight or ten inch clay flower pots
12 mini flower pots
1 drill
1 spool med. wire
assorted acrylic paints
1 paint brush
Instructions :
At opposite points on first large pot drill small holes , drilling them at top area , then drill two in the second pot , only this time have them coming at bottom, thred wire thru , now with the smaller pots drill holes thru the bottom of all twelve , making 2 holes , one on each side , now connect small pots together with the wire , making the arms and legs of your buddies , now connect wire thru top pot , having the small pots dangle as the arms, then have the small pots come out of what normally would be the top of second larger pot , these will be it's legs , now using your paints decorate your buddies , painting on it's clothes and features
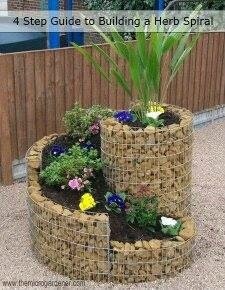
Rock and Wire Planter
Needed:
Heavy Gauge Chicken Wire (amount depends on how large planter)
1 spool heavy gauge framing wire
10-25 Pounds Garden Rock(NOT Gravel) as above , amount depends on size
10-30 pounds potting soil (enough to fill your structure once finished
1 Garden Shovel
1 Garden Trowel
1 pair wire cutters
1pair plyers
4 -6 plants of your choosing (or seed packets)
1 Watering can or hose
Instructions :
Using your wire cutters , plyers and your heavy gauge wire construct a sort of spiral, large at the top and tapering off at bottom , then repeat with a second piece of wire , to the same measurements , then using your framing wire , connect your two spirals together, now add your rocks into your frame, Making sure they don't fall thru , once filled *(as shown above) now add in your potting soil and your plants , or seeds , and remember to water so they will grow
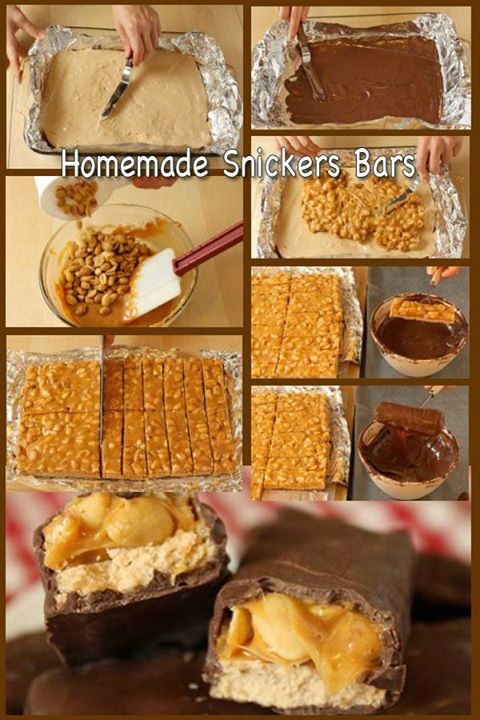
Homemade Snicker's Bars
Needed :
24 oz. chocolate
7 oz. marshmallows
1/4 cup condensed milk
1/3 cup peanut butter
14 0z. caramels
14 oz, whole peanuts
10 oz. chocolate
Tools needed:
1 double boiler
1 rectangular pyrex dish
1 roll aluminium foil
1 wisk
1 kitchen knife
Instructions :
line your pyrex dish with your foil , melt your ten ounces of chocolate and line your foil lined dish with it, spreading to coat bottom and sides of dish, while this sets up , melt your marshmallows and combine with your condensed milk and peanut butter wisk these three ingredients together and once your chocolate in dish has set up , pour in your marshmallow peanut butter mixture in and let set , while that is setting up melt your caramels and mix in your whole peanuts, then spred ontop of your last layer and let set , now melt your remaining chocolate and pourr ontop of your peanut caramel layer , once set carefully remove your foil and slice your candy into individual bars, and now you have your very own snicker's bars
